Tuesday 16 July 2013

Review: Michael Kors Medium Jet Set Saffiano Tote in Black


In addition to a few kilograms of makeup, clothing and accessory bits and bobs, and a pair of Prada sunglasses, my main purchase of my NYC trip was this Michael Kors Tote bag. This purchase was not a planned buy, but after being responsible throughout the trip and making the most of the beautiful weather by walking to places, and using the subway, (which was often an eighth of the price of a cab) I found myself ‘sparing’ a few hundred dollars on the last day. Our last day consisted of a trip to Union Square to hit Zumiez, a flagship urban clothing store, and Nordstrom Rack, a big department style store with discounted, last season high-end brands. And after not finding much there, we headed back up to Times Square – first stop, Macy’s! Believe it or not, this was our first time actually going inside, despite it being 2 minutes away from us, and somewhere we passed by every day, a department store, much like the ones in London just did not tickle my fancy. 
Now, I must confess, Michael Kors has never been a brand I see myself wearing, neither have I ever lusted over any of their products. But somehow, in the moment, I decided I needed a bigger travel bag for my flight the next day. Considering the price, the Medium Jet Set Saffiano Tote seemed a justified choice, and within minutes I found myself waiting for the lady to check the stock. Obviously, they were out stock. However, having set the idea in my mind and having envisioned tomorrow’s flight with a bigger bag, I was determined to make this bag mine. We then walked onto Fifth Avenue and straight into Lord and Taylor and bought the bag straight away!
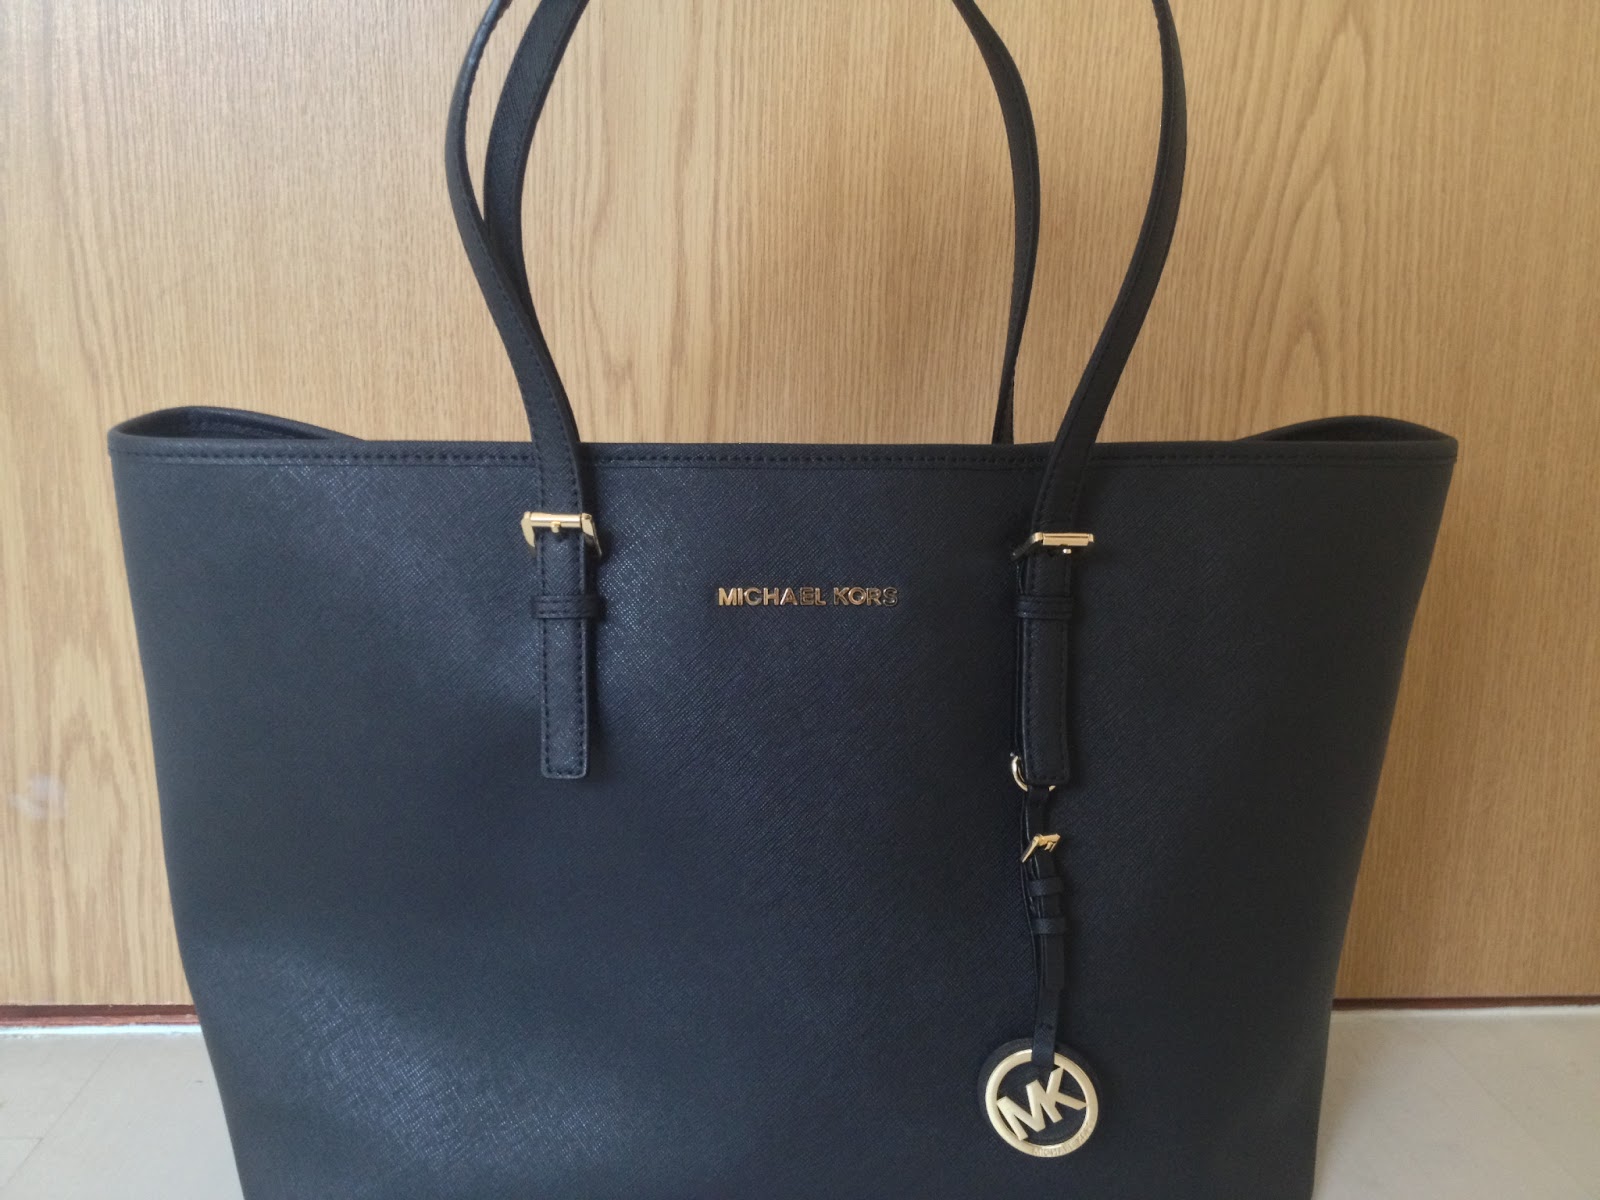
Thoughts on this bag: Spacious! If you’re anything like me and carry random things ‘just in case’ and are in love with the look of big bags, this is for you! The bag has 3 sections, with the middle section having a zip. There is also a small zipped pocket on one side of the bag, and a couple of open pockets on the other – ideal for your phone. This bag has gold hardware that isn’t too obnoxious - couple of dainty buckles on the straps, and of course the lettering and logo at the front. I’m going to be using this bag for more casual occasions such as Lunch or dinner dates. But because of it’s classic, structured shape, and colour, this bag can also be dressed up, perhaps with leather skinnies, ankle strap heels, and a sheer top.
If you like holding your bags onto your shoulders, you may struggle by doing so with this bag due its shape and size. As it’s quite big and square like, you are better off holding it on your arm.

New York Series: Where To Eat


I know the first time I head to the US I was so overwhelmed that I didn’t know where to start in terms of shopping, sightseeing, and dining. Thankfully, I spent over two months away that summer and overtime managed to accomplish quite a bit including a road trip around California and a visit to Las Vegas, Nevada. However, my visit to the US this time over was rather different, and I’d be lying if I said I did not panic over choice of places to visit due to the shorter duration of my stay.
Here, I have chosen a few of my favourite places to eat in New York City and hopefully this would be helpful for those looking to visit in the near future!

At first choice and a definite recommendation I would suggest a visit to Red Lobster – serving seafood with a variety of dishes including soups, salads, and pasta’s. If you choose to dine here, why not try one of their deliciously refreshing frozen margaritas? Also, skip the diet for the evening, the garlic and cheese buttermilk biscuits are possibly the tastiest food I ate whilst being away!

If you’re opting for something healthier and with a large variety of ingredient options, head over to Gigi’s Café. Here, you can build your own salads, pastas, and sandwiches with all fresh, crisp ingredients and the dish will be prepared there and then right in front of you. Chipotle, a Mexican grill located on almost every other block on the streets of New York is also a quick and healthy option for readily made salads, tacos and burritos.

When looking for cheap and cheerful food on-the-go, then I would suggest the mouth watering, fresh pizza slices from 2 Bro’s Pizza (also prepared in front of you after ordering). At 99cent a pizza slice (very large pizza slice!) you cannot really go wrong – apart from the desire for more slices.

Now, a trip to NYC would not be complete (or so I tell myself) without indulging into full fat burgers and deep fried food. For a sit down meal at a burger places as opposed to your typical fast food restaurant, head over to BRGR for pure beef and turkey burgers but do not forget the side order of onion hay. Being a lover of onions, these fried onions were insanely tasty and like nothing I had tried before.

Finally, Chinese! We’ve all seen the cute white take out boxes in the movies, and we’ve always wished we had them here. So on the last night, we ordered Chinese straight to our hotel, spent a tad too long taking snaps of the boxes but the food was worth the wait!


Saturday 13 July 2013

How To (try) Beat The Holiday Blues


One thing that’s for sure is the serious episode of post holiday blues that I am going through at the moment. However, along this bumpy ride I have discovered a few tips that may (or may not) get you through the period of depressing feelings and serious boredom that you tend to go through when returning back to the realities of life. 

1)    Unpack as soon as possible – seriously, there is nothing worse than climbing over suitcases and rummaging through bikini’s and short shorts than you wouldn’t dare to wear back home. As sad as it may seem to put all your favourite clothing pieces back in the closet of boring dullness, it will quickly normalize things at home.
2)    Avoid wallowing at all costs – Sitting at home, flicking through pictures may seem an easy option but it should be avoided. Instead, be happy that you had a wonderful time away, and share the positivity by telling your friends about the time you had.
3)    Keep yourself busy – Be productive, socialize and pick up new hobbies for the rest of your summer! Personally, I joined the gym again in hopes to fill up some empty time and work off the Dunkin’ Donut treats (woops).
4)    Pamper yourself – Unfortunately some of you may have to rush back to work after returning from a blissful break. Even so, find time to treat yourself. A bubble bath, a manicure, your favourite meal accompanied by an episode of New Girl could do the trick!
5)    Look forward to the future – Plan new trips! No one is asking you to get the credit card out just yet, but look into further holiday for the next break you have. Look forward to something new, this will keep you positive for what’s to come in the near future. (I may have already booked a holiday to Almeria with some friends for the coming weeks…)

Hope this helps xo

New York Beauty Haul


Now by no means is 15 lip products justifiable, but I’m going to try my hardest here! As most of you, I’m assuming will already know, most of the USA’s drugstore products are not available to us in different parts of the world. Or often, we have to wait for months until something as simple as a lip balm can be released to the UK’s beauty market. Therefore my mission for this trip was to hit the drugstore’s in full force and grab as many things that I’ve been lusting over.
Evidently, the incredibly cheap brand Wet & Wild won me over! With lipsticks and blushers priced around $3 I took no chances and grabbed almost every shade that suits my complexion and I can confirm they were my star purchases of the trip. The Wet & Wild matte lipsticks are products that I’ve not heard anything about, but the risk I made was totally worth it as these are now my favourite matte lips. The texture of these products are moisturizing when first applied and then dry to a semi matte, velvety finish with incredibly long staying power.
A US trip would not be successful without an EOS lipbalm, I picked up this one in ‘Strawberry Sorbet’ and it’s just your average lip balm with quirky packaging- not much to add to that. I also picked up a Maybeline Color Whisper in the shade ‘Lust for Blush’ a natural, pinkey nude with an added sheen – very moisturizing and due to the added buttery texture the lasting power is not great. Re-application is required after 15 minutes!
A product that has always gained my interest is the Ben Nye Banana Powder, so I picked up a bottle and I’ve loved using these over my t-zone and under eye area over concealer. It’s an extremely, finely milled powder with a non chalky finish allowing your own skin to shine through but keeps greasiness at bay.
Of course I had to hop on to the bandwagon and pick up a bottle of Makeup Forever HD Foundation – although due to the hot weather I’ve been sticking to Tinted Moisturizer and haven’t been able to test this product out yet. Another cult product is Sephora’s Mineral Powder brush, so I quickly picked it up and I’ve loved the finish this gives to my skin and it’s quickly replaced my Real Techniques Buffing Brush! From Sephora, I also picked a Color-Adapt Bronzer, Highlight in ‘Star Dust’, an eye crayon in ‘Matte Dark Brown’ and a waterproof eyeliner in  ‘Cocoa’ and I’ve been pleasantly surprised by these.
I discovered a New York based brand called Nikka K and picked up a couple of their eye crayons and lip products, the crayons have a living power of a few hours, so I’ll suggest an eye shadow primer before application.
A few NYX blushers and lip products were quickly placed into my shopping basket too as I’ve been wanting to test these out for months. Once again, the reviews and raves have not failed me and these products have earned a spot in my favourites.
Finally, I picked up a couple of mascara’s – Revlon’s Grow Luscious, and L’oreal’s Telecsopic Shocking Extensions. And a lipstick from Milani in the shade ‘Nude Crème’ which is basically a dupe for Mac’s Hue both in texture and colour. 
Let me know if you would like an in-depth review of any of the products! 

xo

Travel Post – Back from New York


So, the reason for my absence, I hope will be justified by the excuse that I was too busy soaking up American goodness in New York City! Having been back for almost a week, I’m still going through an intense holiday blues period whereby everything brings back memories of my amazing time away, and almost nothing has managed to brighten my mood – not even the sun! 
Needless to mention, New York was out-of-this-world. The City That Never Sleeps - a well fitted label with the bright lights and sky scrapers of Times Square always sparkling like diamonds, looking down at crowds upon crowds of people, shops open practically until midnight with some open even beyond that. Restaurants and bars filled with happy people, such welcoming smiles and conversations. The city is filled with fashion, media, art and entertainment, of which it oozes creativity from its every corner. A comforting feeling of never being alone accompanies you on the streets of New York. Car horns, the sounds of people talking, the smell of carbon monoxide mixed with smells of food being cooked on stalls, from every corner, bring life to your surroundings. I could literally go on and on. You can tell I’ve been mesmerized and fallen head over heels for the hustle and bustle that comes with the city of New York.
I have attached some images from my trip and will follow this post with some snaps and short details of what I bought on my one too many shopping trips out there!


Tuesday 18 June 2013

Review – Palmer’s Cocoa Butter Natural Bronze Gradual Tanning Moisturizer:


If you know me personally then you would most definitely know that I hate tanning, whether that be a natural tan, sunbed, spray tan or a tanning product. Of course many jaws will drop, frowns will be formed and eyes will be rolled at this remark, however I just don’t think I look aesthetically pleasing once I catch the sun. My natural skin is not exactly pale so I tend to embrace the natural ‘tan’ in my skin tone, rather than try to enhance it. I have a rather pale olive skin tone, with yellow undertones – this means when I tan, which I do incredibly easily, my skin turns to a golden brown colour. Sounds beautiful, I know, but it just does not suit me!
Having said that, because my arms are usually more exposed than my legs are, I always find my legs to be incredibly pale and not balanced with the rest of my body. For that reason I was on the hunt for a subtle tanning product to just equalize the colour distribution all over my body, and that’s when I find this gradual tanner.
Now, I think everyone has at one point in their lives loved the original Palmer’s cocoa butter moisturizer, so when I set eyes on the gradual tanner I felt an odd nostalgic and comforting vibe from this bottle. This product claims that it ‘Builds & maintains a natural looking tan for all skin types’ – and well, I agree.
This is a perfect tanning product for beginners (like myself) as it’s extremely easy to use, no fuss, no mess and you use it just like you would a normal moisturizer. I like to apply a couple of pumps worth and evenly distribute it by rubbing it into my exfoliated legs and feet. What is extremely important to me is the smell of tanning products, the feeling it leaves it on my legs, and the colour result. This product ticks all of the above. After application, there is a sweet cocoa butter meets chocolate scent, though it does not linger on for too long – at least it doesn’t smell of the chemicals that other tanning products smell of! It also feels extremely light on the skin, it absorbs quickly and there is no sticky, greasy aftermath. More importantly the colour payoff – what amazes me most about this product is the results. I’m not sure if there’s something about the way it reacts with skin tones but it gives me the perfect colour, matching the rest of my body and leaves my skin looking completely natural. 

I really would recommend this product if you are looking for a colour boost, or to even out your skin tone.

xo

Monday 17 June 2013

Ootn: Monochrome Madness

Here’s a peak at what I wore out one night this weekend – brace yourselves for... More monochrome. With monochrome being a trend that appears to be hot at the moment (when is it not?), I thought I’d take advantage of this and keep my look rather classic and simple. I would usually add a bright lip, or nails to an outfit like this, but as always I was in a rush to leave the door and my nude lip was frantically applied in the car!
This little crop top is from Topshop and I love just how versatile it is – I pair it with high waisted trousers, skirts, shorts, just about anything.
This stripey midi skirt is also a versatile statement piece in my wardrobe that I like to wear on my casual days with t-shirts, flats and a cute satchel. Or I can dress it up like I did on this occasion with heels, a clutch and accessories.
Topshop’s Allegra’s were my heels of choice. These boots are just like your regular Chelsea Boots with a chunky heel, super comfortable and match almost everything. I love pairing these with dresses and skirts as they toughen up an outfit by adding edge.The Allegra boots are no longer available, but here's a similar option.
This cute clutch is a little quilted, vintage beauty that used to belong to my grandmother. What I love about this bag, besides the fact that it was my grandmothers, is the beautiful alligator skin detailing on the leather – it adds additional dimension and detail to a simple outfit.

Here’s to yet another monochrome outfit!

xo

Review: Garnier Pure Active 2in1 Tinted Spot Roll-On


Today, I am going to share with you a somewhat review/recommendation that I think deserves more attention than it receives. I found this little beauty in TKmaxx a year ago, and with the price being around the £5 mark I thought I’d give it a go and throw it out if I didn’t see results. But oh how I was pleasantly surprised!
The Garnier Pure Active 2in1 Tinted Spot Roll-on (gosh, what a mouthful!) works as a concealer over blemishes but also treats problematic skin whilst concealing it. Sounds perfect right? Due to ingredients like Salicylic acid, herbasmooth and mineral pigments, this product soothes skin, reduces spot size and keeps them at bay.

*Just for reference, I have combination skin (leaning towards the dry side) that is highly sensitive and prone to breakouts. *
I will start by declaring my love for the application of this product, the roller ball design makes it so easy to swipe onto blemishes and due to its light consistency you do not have to spend time worrying about blending it in or setting it into your skin. I prefer to swipe the roller ball on top of any blemishes then lightly tap it in using my finger. There’s also something oddly refreshing and soothing about the metal roller ball against your skin at 9am when you need a boost to wake you up! Though it is extremely light on the skin, this is a full coverage concealer, leaving a smooth, even finish. It covers scars and spots like a dream but also leaves the skin looking natural, as if you’re not wearing any product at all.

Now, concealer aside – how does this product work as a spot treatment? On bad skin days, I skip my whole makeup routine and only use this all over blemishes and by the end of the day all spots have reduced in size and redness by significant amounts. I have also found this product has helped with blemish scars, and over time they have become more faint.
For the purpose of this review I tried to consider any downfalls this product may have, but I don’t think it has any! I highly recommend this concealer treatment, and I’ve found the cheapest place to buy it to be here.

Thursday 13 June 2013

How to: Flat lifeless hair to Volumized big hair


So, I’m a big fan of big hair – the bigger the hair, the closer to heaven.. Right? I prefer the just-got-out-of-bed look, sort of messy, somewhat backcombed, effortless though tamed. I understand some try to prevent the nest head appearance at all costs, but this is just a personal preference coming from someone who has wanted dreadlocks since the age of 9! Naturally, my hair falls straight with the occasional wave therefore I rely heavily on a few items to achieve my desired look. I wont go into detail about my hair care routine as I have posted it in full detail here.

This Fudge Sea Salt Spray is sprayed on semi damp hair, scrunched using hands and left to dry naturally. It provides undeniable volume, and lifts the roots of hair along with shorter layers. I love this product and have been using it for 2 years now; I also like to use this on second day hair to refresh style. This can also be used on wet hair then blow dried to create volume and fuller looking hair, which is ideal for those who like straight hair but seek volume too. This spray has a beautiful summer scent of coconut (Malibu in a bottle) and the smell lingers on for a while, which I absolutely love! A major thumbs up for this product as it feels very light and does not make my hair feel weighed down or greasy. Considering the price (£6.99) and the amount you get in a bottle (150ml), I don’t see any cons in this item especially as you only need to spritz a small amount to get big results.

Another product I like to use only when blow-drying my hair is the Tresemme Root Boosting spray. I find that if you use this spray directly onto your hair as instructed it ends up making your hair feel weighed down and rather greasy. However, I’ve found the best way to use is to carefully spritz some at sectioned hair prior to blow-drying with a round brush. It creates added volume and bouncy waves.

The vo5 Plump Me Up dry shampoo is another favourite of mine. You use this spray just like you would any dry shampoo, by spraying it onto the roots or areas that feel dull and need uplifting. What I love about this product is that not only does it work great as a dry shampoo but it also creates great texture and body to lifeless hair. And for that reason I use this for multiple purposes - when my hair needs refreshing, but also when I want added texture. I must admit, I still find myself backcombing my hair at the roots in conjunction with this product but the texture it creates is too great for me to pass this product.

I’ve read one too many negative reviews about volume powders being too heavy and creating product build up, but this little gem I found in Sally’s works wonders on my hair! I like to use this on freshly washed hair, as that’s when my hair is most stubborn and likes to fall dead straight and fluffy. As opposed to dusting this directly to my roots, I like to place some onto the tips of my fingers and massage it through the roots of my hair.

This backcombing brush is carried around in my handbag almost all the time. Despite the claims surrounding backcombing and its damaging effects, I have been backcombing my hair since I was 14 (good ol’ scene days). I think as long as you are gentle, do not go too frantic with the brush and use products that maintain nourishment and tangle free hair, the risks of damaging your hair are quite low. I purchased this brush from Sally’s and sometimes I can skip using all the products mentioned above and only use this with some hairspray. I roughly section my hair and gently push back the roots of my hair locking my hair into shape. I never backcomb ontop of my hair, but rather from underneath the sections I have created.

Do you have any recommendations for big hair?

xo

Wednesday 12 June 2013

Holiday OOTD's:


Only after returning from my holiday did I realize that I should have taken photos intended for ootd posts, however after a scroll through my holiday snaps, I thought perhaps a quick collage of a few of my outfits might do the trick. Here are four of my holiday outfits featuring playful prints, Chelsea boots, a leather gilet and a bright turquoise bag. Hopefully this post will show you how to play around with outfits using the some of the same items.

Outfit 1: Zara Basic white vest paired with Topshop dye print trousers (old season), Bershka leather gilet (old season) and Topshop Chelsea boots.
Outfit 2: Zara maroon vest, H&M black hoodie, Bershka gilet (old season) , Forever21 animal print trousers and Topshop Chelsea boots.
Outfit 3: Zara over sized t-shirt , Zara skinny jeans, Topshop Chelsea boots.
Outfit 4: Topshop Mickey Mouse vest, H&M hoodie, Primark maxi skirt tied with a knot on the side and Topshop ballet pumps

xo

NOTD: Rimmel Salon Pro Kate Moss Polish in 'Punk Rock'


I am pretty sure you’ve all heard the buzz around the Rimmel London Salon Pro, Kate Moss polishes, but here’s a short review of how I got along with the shade ‘Punk Rock’. As you can see in the image, this a purple toned dark grey with a high shine finish. This polish has Saina written all over it – I pretty much wear dark colours all year round with the exception of nudes and pastels. At one point in my life I wore only black nails for a whole year!

When I saw the polish stand in Boots I almost instantly gravitated towards this bottle knowing it was my favourite out of the range. What I love the most about this range is the brush size, a wider brush allows easier and quicker application, with smaller nails being painted in one swipe. The range also boasts a long lasting, chip resistant finish that should last up to 10 days – however having worn another shade from this range (post coming soon) for the past 5 days I found the edges to peel off due to its somewhat thick, gel like consistency and a few chips here and there. So I’ve decided to give this one a go and see how much wear I can get out of it before needing to switch things up.

xo

Back To Reality: Disneyland Paris Travel Post


As you may have gathered from my last post, I disappeared off for a while into the magical world of Disneyland Paris. I’m back now and going through a definite post holiday blues and feeling a lack of motivation towards all communication and social networking sites. All I seem to want to do is lounge around in some sort of Disney print pj’s and watch Disney films! 

With that being said, the experience was amazing, being around people with similar interests and a love for all things Disney, although I must admit sometimes the children were a tad too much to handle. We had access to both parks and with our hotel being located inside the park; we pretty much spent all day and night inside the park watching animated/live shows, or on rides. When we weren’t being dropped from high tower rides, and doing 360 turns on rock ‘n’ roll rollercoasters, we spent our time inside the Disney Village, which had all our meal time needs – McDonald’s, Starbuck’s, Planet Hollywood, Rainforest Café, Steak House, French bars, you name it.

If like me, you were deprived of visiting Disneyland, I would definitely recommend a short visit. It’s a world of history, and ageless, magical fantasies.
xo

Friday 7 June 2013

My Travel Makeup Bag:


So my sister and me are going to spending the next 5 days in Disneyland Paris, and this is the content of my makeup bag that I will be taking on our travels. I tried (emphasis on tried) to keep my products to a minimum, as our luggage weight allowance is quite low. 
For foundation, I took two products – the Chanel Vitalumiere Aqua for a rather light feel and coverage, and it also has SPF15, which my skin will need during the day. But I have also packed my Estee Lauder Double Wear incase I want a more heavy-duty foundation during the evenings. To ensure my foundation is kept in place during our long hours in the park and with the addition of water rides, I’ve also packed my Benefit Porefessional primer. I have packed two concealers, bareMinerals correcting concealer for under eye areas, and my Collection Lasting Perfection for any blemishes.

  For a natural bronze glow, I’m taking my Dior Amber Bronze, and as for highlighter the Topshop cream blush in Butterscotch. Mac’s Pearlmatte powder, ‘Sunday Afternoon’ is the only cheek colour I’m taking as it has 3 different shades, which I can alternate, or use swirled together throughout my stay. 


Sleek’s Nude collection eyeshaddow palatte should be all I require for my stay; the palatte has 12 neutral shades, some shimmery and some matte. I will also be taking two cream shadows – MAC’s ‘Bare Study’, which is a gorgeous champagne frost, and Stila’s smudge pot in ‘Bronze’, which is a metallic bronze with slight shimmer. These products will work well either on their own, or can be used underneath my powder eyeshaddow to ensure longer lasting results.  I will be taking two eyeliners with me, Collection’s Extreme Felt liner (my favourite liquid liner) which I know will keep my winged liner put for the whole day, and Rimmel’s Scandal Eyes Liner in Nude to brighten my eyes. Two eyebrow products will be traveling with me - Sephora's Waterproof pencil, and my usual Stila eyebrow set in 'dark'. As for mascara, L’oreal’s Telescopic has earned a trip to Paris – this mascara creates long, separated and curled lashes in just two coats. 


I am going to keep things rather minimal when it comes to lip colours, with one bright lip – MAC’s ‘Fusion Pink’, one nude lip - MAC’s Myth, and as an added extra I will be taking L’oreal’s Rouge Caresse in ‘Fashionista Pink’ which is milky baby pink.

The only makeup tools I am taking are the Eco Tools Travel set that includes four brushes for foundation buffing, concealer application, brozer and blusher. These brushes are super soft, dense and apply makeup like a dream! I'm taking one shaddow brush that I've managed to fit inside my sleek palatte. I will also be taking my Eco Tools angled brush (for eyebrows), a spoolie and eyelash curlers.

Let's just hope I haven't missed anything! 

xo


Wednesday 5 June 2013

NOTD – Essie - Power Clutch:


So after a few days of wearing Essie’s loud and proud orange, ‘Fear & Desire’ I was eager to get back to my neutral nails. Today, I applied Essie’s Power Clutch onto my nails, which is a deep, green toned grey with a cream finish - this shade is part of Essie’s Autumn 2011 ‘Carry On’ collection. After applying two coats, I find that the green is definitely cancelled out and the colour edges towards a dark, charcoal grey.  Despite being a big fan of Essie polishes, I must admit this colour does not have great lasting power but this does not stop it from being one of my favourite shades. With my usual application of Seche Vite topcoat, I can go about 2 days without any chips. I wish I could wear this colour longer without having to worry about colour chipping away, but I still love the shade!

xo

Tuesday 4 June 2013

Finding The Right Foundation:


If only this was the lot!

Choosing the right foundation can be a long, dreaded process of colour mishaps, skin reactions and breakouts, and if that’s not bad enough we end up wasting money on products that we’ll never end up using. Personally, the process of foundation hunting took me a couple of year’s worth of trial and errors, however if I were more aware of what I wanted then this could have been a shortened process. Today, I am going to give you some helpful (I hope) tips in regards to finding the right makeup base your skin type requires.

Firstly, ask yourself what you want from a foundation, whether that be a light or full coverage base, a matte or dewy finish or perhaps you want to add more colour to your complexion? Do you have sensitive or acne prone skin? Are there product ingredients you should steer away from? Would you rather a liquid or powder base product?  If you have oily skin, you may want to consider a powder base to mattify excessive shine. On the other hand, cream and liquid foundations may be considered for dry skin requiring moisture. Overwhelming, I know! But once you have decided, look up reviews of say ‘light, dewy foundations’. I personally find reading reviews more helpful then talking to someone at a makeup counter because the answers are honest and are not in favor of any brand or product.
 
Would you buy a pair of jeans without trying them? 
Often finding a colour match at a high-street store can be difficult, and unfortunately all I can suggest is trying the product from your lower cheek down to your jaw/neckline and leaving the store to see it in natural light. One way to narrow down the process, is to know your skin tone, pale, medium or dark? Then try and judge by the shade names/swatches. However, if you’re considering a high-end brand at a department store you can be guided further in finding the right shade – remember, you can always ask for a sample so you can test it at the comfort of your own home and see how your skin reacts to the product. Do not be hesitant in asking for a sample because you’re the one that’s going to be paying around £30 for a bottle – the beauty consultants are there to help, not to intimidate you!

Remember, your skin needs may be different for your desired day and night looks. A light foundation with SPF may be ideal for during the day at work or school, but for evening occasions you may want something heavier that does not make you appear significantly paler in flash photography. Furthermore, your skin type is bound to change over time or through the change of weather/climate/season. So, do not be surprised if your mattifying, powder foundation, that worked oh-so-perfectly during the warmer months starts to cling to dry skin patches during winter. This is your skin reacting to climate change, the product remains the same.

Hope this helps!

xo

Monday 3 June 2013

OOTD - Sunny Start To The Week


Despite being a winter baby with the warmer seasons being my least favourite, I woke up this morning feeling rather happy to see the sun. Who doesn’t like to start the week off with a bit of sunshine eh? Here’s a quick outfit I threw together to go run some errands, and as usual, to get my daily fix of Starbucks. 


These hareem style trousers are a sale purchase I made from Topshop a couple of months ago. They are so lightweight and perfect for this season. The trousers have a very small, black and white checkered meets dogtooth detailing making it easy to pair with a variety of bold coloured t-shirts – I just wore my oversized basic, black vest from Zara; but it would work with almost any colour, be that electric blue, neon yellow, fuchsia pink etc. 


My shoes are just basic pink ballet pumps from Topshop which I’ve worn one too many times and are in need of replacing – big time! As for accessories, I wore my long Hamsa chain from Topman, my usual miscellaneous bracelets, along with my classic Ray-Ban aviators. And finally, the skull-studded chain bag featured in this outfit is an old purchase from ASOS.

Hope you’re enjoying the weather!

xo